Native iOS
Create an iPhone App
Requirements
Once you created an iPhone App you need to add a few entries to the .plist file:
<key>Privacy - Location Always and When In Use Usage Description</key>
<string>...</string>

<key>Privacy - Location Always Usage Description</key>
<string>...</string>

<key>Privacy - Location Usage Description</key>
<string>...</string>

<key>Privacy - Location When In Use Usage Description</key>
<string>...</string>

<key>Privacy - Motion Usage Description</key>
<string>...</string>
📘Please note:
Generally, all location permission is necessary to be able to track and create trips. Only with Always permission, trips can be tracked in the background. The (fitness &) motion permission is necessary to be able to detect a trip has ended (i.e. motion state isnot _driving_ anymore).
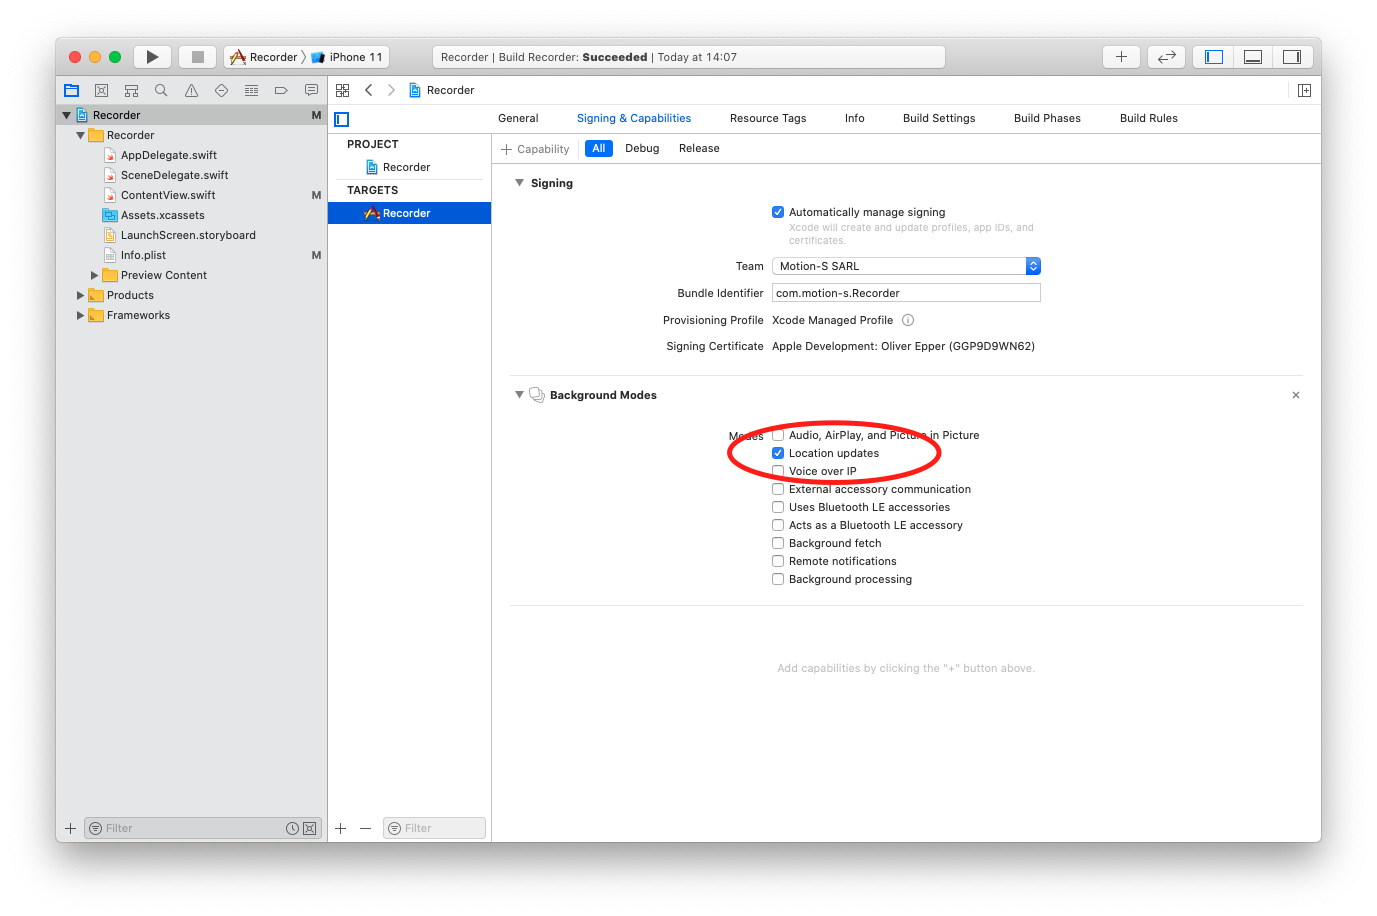
Further you have to give your App the permission to collect location data in the background. So please add the background capability to your app and activate the mode location updates.

Installing the MotionSDK
Download the SDK and unzip it. Please contact our team for the password.

Drag & Drop the MotionSDK.xcframework to your project. Make sure to check the options copy items, create groups and add to Target for your project.
In your project Target under Build Settings search for "import paths". You must provide the path to the directory of each .swiftmodule directories are:
Add the following two values to Import Paths under Swift Compiler - Search Paths:
$(PROJECT_DIR)/MotionSDK.xcframework/ios-arm64$(PROJECT_DIR)/MotionSDK.xcframework/ios-x86_64-simulator
Using the MotionSDK
All you need to do is to create and retain an instance of the AutomaticRecorder class (f.e. in your AppDelegate):
var tripRecorder = AutomaticRecorder()
There are two required imports:
import CoreLocation
import MotionSDK
A view showing the complete recorder state can be achieved like this:
@EnvironmentObject var tripRecorder: AutomaticRecorder

var body: some View {
  VStack {
    Group {
      Text("Recorder: \(tripRecorder.state.rawValue)")
      Text("Authorization: \(tripRecorder.authorizationStatus)")
      Text("Last Location: \(tripRecorder.wrappedLastLocation)")
      Text("Recorded: \(tripRecorder.recordedLocationsCount)")
      Text("Start: \(tripRecorder.wrappedTripStartTime)")
      Text("Distance: \(tripRecorder.wrappedTripDistance)")
      Text("Region: \(tripRecorder.wrappedMonitoredRegion)")
    }
    Text("Last Trip: \(tripRecorder.wrappedLastTripId)")
    Text("Last recorded (but not yet uploaded) Trip id: \(tripRecorder.lastRecordedTrip?.id)")
    Group {
      Text("Received uploading error:")
      Text("Trip id: \(tripRecorder.receivedRejectionMessage?.tripId)")
      Text("Error message: \(tripRecorder.receivedRejectionMessage?.message)")
    }
    Group { // only available with the AutomaticRecorder
      Text("Motion: \(tripRecorder.motionActivity)")
      Text("Confidence: \(tripRecorder.motionActivityConfidence)")
      Text(tripRecorder.wrappedWillStopRecording)
    }
  }
}
If you want you can add a subscriber to any of the properties of the Recorder. For example:
let _ = tripRecorder.$lastTrip // published after upload to the Motion-S backend
.compactMap { $0 }
.sink(receiveValue: { trip in
  print("The last saved trip has the id <\(trip.id)>.")
})

let _ = tripRecorder.$lastRecordedTrip // published after recording, before upload to any server
.compactMap { $0 }
.sink(receiveValue: { recordedTrip in
  print("The last recorded trip has \(recordedTrip.locations?.count) locations.")
})
Test your App in the simulator
The MotionSDK runs in the simulator as well as on a real device. So you can just start your app in the simulator and load a gpx file. The recorder will automatically start recording if the provided trip will leave the 100m circular region that the recorder monitors. Since the Simulator cannot simulate CoreMotion (which is needed for stopping a trip in automatic mode) it is useful to provide a way to call the stop() function.
Button(action: {
  self.tripRecorder.stop()
}) {
  Text("Stop Recorder")
}
Using the SDK manually
CoreMotion permission is used to detect if a trip has ended. You can skip this permission and use the SDK manually to start and stop trip recording. To do so, create an instance of the BaseRecorder class, instead of an AutomaticRecorder:
var manualTripRecorder = BaseRecorder()
The properties for use in your views all belong to the BaseRecorder: they can be accessed like drafted in the example above.
In your recorder view you can provide buttons to start and stop the recording manually. Please also take care for uploading data (save()) and resetting the recorder state (reset()) manually.
Button(action: {
  self.manualTripRecorder.start()
}) {
  Text("Start Recording")
}
Button(action: {
  self.manualTripRecorder.stop()
  self.manualTripRecorder.save() // stores the recorded data and sends it to your upload endpoint - is done by the AutomaticRecorder usually
  self.manualTripRecorder.reset() // resets the recorder state - is done by the AutomaticRecorder usually
}) {
  Text("Stop Recording")
}
The stored trip data is sent to the upload server by a system uploadTask. Your app can trigger an upload by calling
APIBackend.shared.uploadPending()
Using the Motion-S backend
Trips are published in recorder.lastRecordedTrip after having stopped the recording. Trips then are validated at the upload server against several conditions. If the uploaded data is not considered a valid trip, the upload server will respond with an error. This error will be populated in the recorder.receivedRejectionMessage tuple. The recorded trip data will be dropped afterwards.
If the uploaded data is considered a valid trip, the SDK will publish a Trip via recorder.lastTrip. This trip will contain your sent trip.id (same as the recordedTrip.id) as well as the trip.sessionId, which is used to identify the trip in our backend.
When the trip has been analyzed, all information from the backend is available in Combine-Publishers:
APIBackend.shared.driverProfilePublisher()
.sink(receiveValue: { driverProfiles in
  print("Received driver profile from server.")
})

APIBackend.shared.tripSummaryPublisher(for: trip.sessionId)
.sink(receiveValue: { tripSummary in
  print("Received trip summary from server.")
})

APIBackend.shared.tripDetailPublisher(for: trip.sessionId)
.sink(receiveValue: { tripDetail in
  print("Received trip detail from server.")
})

APIBackend.shared.tripsPublisher()
.sink(receiveValue: { trips in
  print("Received all trip mappings from server.")
  trips.forEach { (sessionId, recordedTripId) in
    print("\(sessionId) -> \(recordedTripId)")
  }
})
Using your own backend
If the recorded trip data should be sent to your backend instead, please provide a corresponding configuration, f.e. as plist files ("MotionSDK.plist" + "MotionSDK-simulator.plist").
Please make sure, for uploadHeader and tripMetadata the entry values are of type String.
Alternatively you can create a Config object at runtime and load its configuration:
#if targetEnvironment(simulator)
let config = Config(
  uploadURL: "http://localhost/accepts-json-post-bodies",
  uploadHeader: ["Authorization": "Basic 12345"],
  tripMetadata: ["fromSimulator": "true"]
)
#else
let config = Config(
  uploadURL: "https://my-own-server.lu/accepts-json-post-bodies?token=12345",
  tripMetadata: ["Device": "XYZ"]
)
#endif

RuntimeConfig.current.load(config)
Final
The Recorder publishes its state via Combine-Publishers. You don’t need SwiftUI but Combine and thus iOS 13 is a requirement.
Updated over 2 years ago